Installation
Requirements
The installation of Fast2 requires a few environment specifications to run properly :
| What | Description | |
|---|---|---|
| RAM | 8GB+ | We highly recommend having at least 8GB. When switching to production environments, 16GB or 32GB will be required since more documents will be handled at once, and heavy tasks (e.g. conversion, extraction) might get short on resources. |
| Processor | 8 CPUs | Processor capabilities need to be aligned with migration requirements, such as data mapping, content conversion and heavy I/O. |
| Storage | 128GB+ | Although the contents dealt by Fast2 will be temporarily stored (and deleted afterwards if asked), the server needs enough storage for the files/contents alongside the database tracking all the migration information. |
| Java | JDK8, JDK11 64-bit |
Any provider will fit (Oracle, OpenJDK, etc). If you have multiple JDK/JRE already installed, specify the correct one in the ./config/env.properties file. The ‘64-bit’ is important for broker-database communication and overall worker operations. However if some constraints incline you to use a 32-bit, consider dedicating a new worker. |
| OS | Windows 7+, Linux | All versions of Windows 7+ are supported. All common distros of Linux are supported (Ubunto, RedHat, CentOS, etc) Power architecture are supported as well (except the ones running in AIX), but only Java parts will work seamlessly whereas third-party software (e.g. imagemagick, libreoffice, etc) might not, as they have not all have been developed for such plateforms. |
While setting up the production server for Fast2, make sure to scale the Fast2 machine accordingly. You may need to increase the allocated memory for both the broker and the background database. If you planned to deal with campaigns of a few millions of documents, setting 8GB of memory for the broker and 8GB for the database as well is a good starting point.
Make sure to confirm the compatibility between the database and your environment :
Fast2 packages
The Fast2 distribution you need depends on your target environment. It exists three way to deploy a Fast2 :
- On premise: regular package, as an all-in-one zip file
- AWS: Standard AMIs
- K8S: Docker Images
Each distribution ships the following
- A broker with one embedded worker and a user interface
- An additional worker with all tasks catalog
- A template to create workers with custom tasks
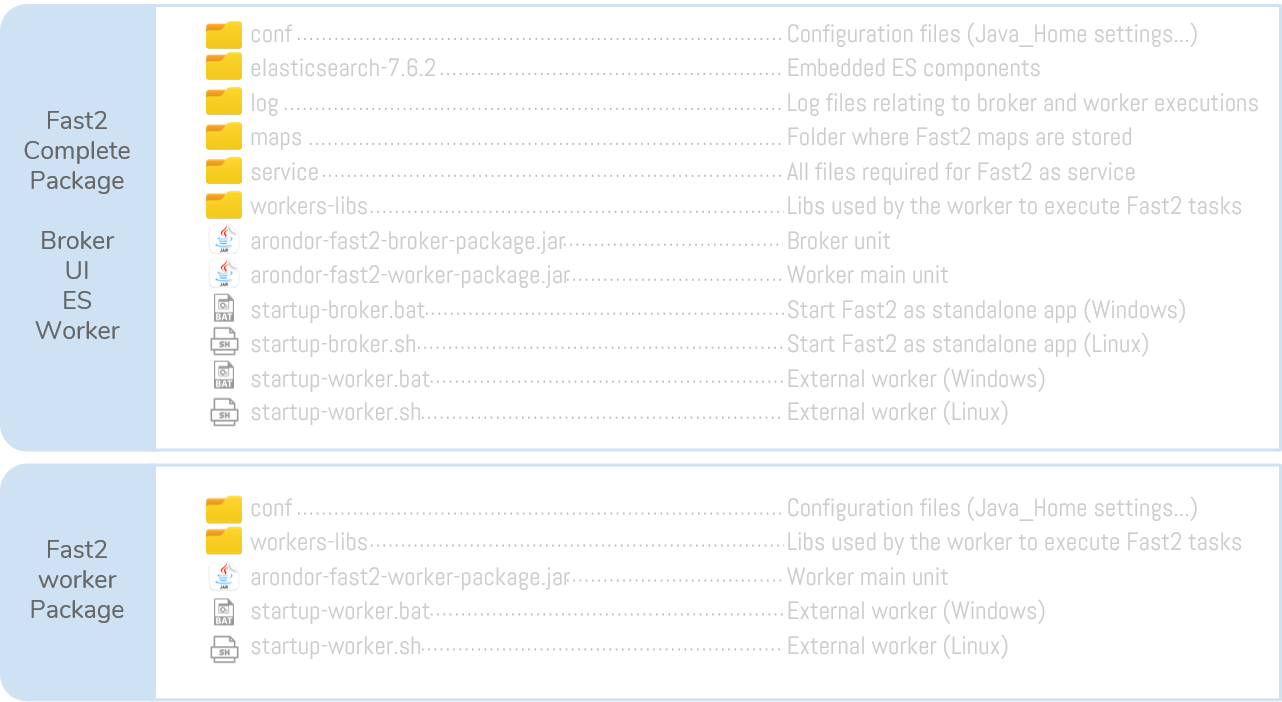
Root folder anatomy
Start Fast2 Broker
Once the regular Fast2 package is unzipped, Fast2 can be launched right away.
Whether Fast2 is launched from the batch file or as a service on your environment, the UI will be available at http://localhost:1789/.
By default, Fast2 Broker starts the database and an embedded Fast2 Worker.
All commands below are to be run under the Fast2 install path (where the Zip has been unzipped).
Start-up sequence
When Fast2 is started, either as a standalone application or a service, its different modules share a precisely defined roll-out schedule:
- First, the broker and the database are started. The connection between these 2 components has to be effective, otherwise Fast2 will automatically shut down after a couple of attempts to reach the database;
- The worker is then triggered, and has to register itself to the broker.
- Finally, dashboards will be started if asked so, and if the binaries have been detected. This is the moment where Fast2 will try to reach a separate instance of dashboards if one is already running on the machine.
There is no direct connection between the broker and dashboards. The only exchange area is the database, as explained in the Architecture section.
From command line
Go into the Fast2 install folder, and run :
C:\path-to-fast2\> startup-broker.bat
Administrator rights might be required since Fast2 will handle some port communications.
To end the Fast2 process, just hit Ctrl+C in the command line the startup file opened.
The following Linux installation steps work for most of Unix-based sytems. The database cannot be started from root user, you will need to create a secondary user to start the database binary alongside your Fast2 process.
Once connected as the latter user, start the database via its binaries.
Then, since the database is started manually, disable the command triggering Fast2 to start the embedded database, from the config/application.properties file :
| Database | Code |
|---|---|
| Kibana | broker.elasticsearch.embedded.enabled=false |
| OpenSearch dashboards | broker.opensearch.embedded.enabled=false |
You can now properly execute the following script:
$ ./startup-broker.sh
To quit the Fast2 process, just hit Ctrl+C in the command line the startup file opened.
As service
Go into the Fast2 installation folder, and open the Windows Command Prompt.
To install the service :
C:\path-to-fast2\service\windows> Fast2_broker_service.exe install
Your machine may prompt a message asking to download .NET components. Please click [OK] and proceed.
Once this command is complete, you should see in your services registory a newly installed Fast2 service. You can start/stop/restart it as any other service, or via the Command Prompt (just replace install in the previous command by start/stop/uninstall/restart/status).
The logs of the service will be available from the path-to-fast2\service\log folder.
There are several ways to create a service under linux distribution. We will do it through systemd. Its major benefit is that it has been the default init system for the majority of linux distributions (Ubuntu, Red Hat, Fedora…).
Create a user for Fast2
Since the embedded database cannot be started in sudo mode, an additional user needs to be created in the Linux machine so the broker will successfully initiate the database bootup.
Let’s condider here our user to be fast2user.
Head out to the ./startup-broker.sh and get the user start the broker by switching users (with su fast2user -c) for the Java command.
Change the follwing line :
"$JAVA" -Xmx$BROKER_MAX_MEMORY -Dlogging.config=config/logback-broker.xml -jar fast2-broker-package-X.Y.Z.jar
to this :
su fast2user -c "$JAVA -Xmx$BROKER_MAX_MEMORY -Dlogging.config=config/logback-broker.xml -jar fast2-broker-package-X.Y.Z.jar"
Execution path
Edit the ExectStart field from the file service/linux/fast2-broker.service by changing the PATH/TO/FAST2 portion: set it to Fast2 install path.
[Unit]
Description=Fast2 Broker

[Service]
ExecStart=/home/userName/fast2-complete-package-2.0.0/startup-broker.sh

[Install]
WantedBy=default.target
Symbolic link
Now link it to the /etc/systemd/system directory through a symbolic link.
$ sudo ln -s SOURCE TARGET

$ sudo ln -s service/linux/fast2-broker.service /etc/systemd/system
If the links are broken once they’re created, you probably need to put an absolute path for the target as follow ;
$ sudo ln -s /home/userName/fast2-complete-package-2.0.0/service/linux/fast2-broker.service /etc/systemd/system
Next, reload systemd services unit and enable them :
$ systemctl daemon-reload
$ systemctl enable fast2-broker.service
The terminal should prompt the following message :
Created symlink from /etc/systemd/system/default.target.wants/fast2-broker.service to /etc/systemd/system/fast2-broker.service.
Script uses
Test your script by starting it and then checking the status :
$ service fast2-broker start

$ service fast2-broker status

OR

$ systemctl start fast2-broker.service

$ systemctl status fast2-broker.service
You can restart or stop the service at anytime with the commands :
$ service fast2 start | restart | stop | status
Start Fast2 Worker
The Broker starts an embedded worker by default. If you wish to start multiple workers, just hit :
C:\path-to-fast2\> startup-worker.bat
./startup-worker.sh
If the worker and broker are not booted up on the same machine, you need to setup the Broker host name in the worker configuration file.
Edit the file config/application.properties and modify broker.host accordingly.
You can setup Fast2 Worker as a service the same way you did for the Fast2 Broker.