Workers
Let’s talk about the workers
The workers! Corner stones of Fast2, these guys can litterally add up and constitute a real digitized hive working to migrate your documents, your contents, your rules, your metadata, all synchronously, exactly where you expect them (or asked them to be), never stepping on each other. No migration project could be overcome if it wasn’t by them!
If they role can seem quite important, they are paradoxically as easy and straight forward to get up and running. Just the right files to gather, as mentioned here, and a new worker just enrolled!
Context
One of the major aspects of a promising migration project is what all project managers will ask you to vouch for: performance metrics. Let’s suppose you need to migrate documents from a source system into a second one, the latter having a much higher input flow tolerance. No need for empirical statistics to know that the old ECM will be the bottleneck. An architecture similar to a hybrid deployment variant (topic we presented here) could easily be envisioned. But let’s complicate things a little bit here: in-between the extraction and the injection phase, the metadata have to be updated, with new date formatting and heavy mapping of document related properties. Can still a hybrid-like architecture save you now ?
How to set up
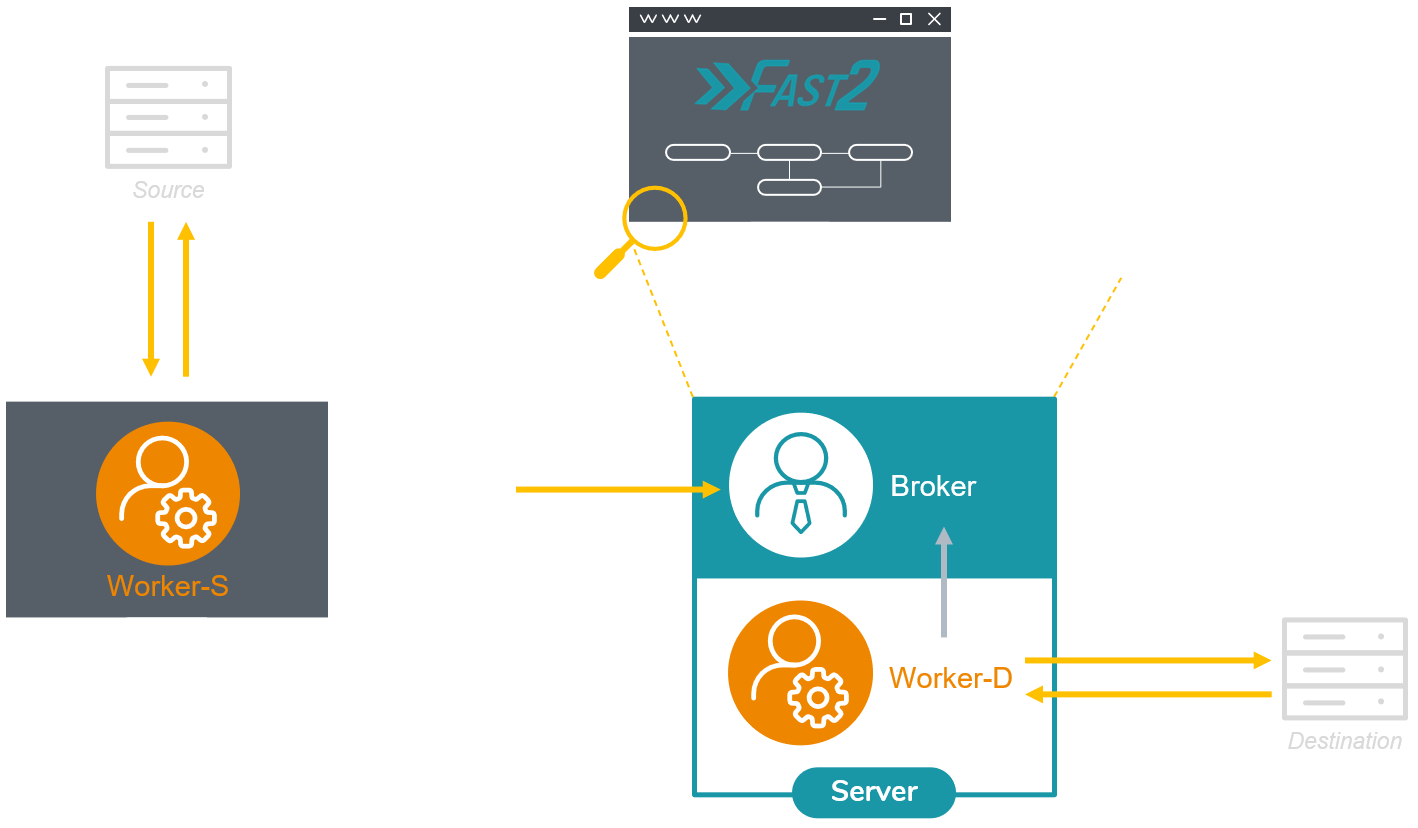
Checkout in the official documentation the required Fast2 files and folders to set up a new worker. Leave a copy of the required files and folder on the machine hosting the source environment. This worker – let’s label it as worker-S for “source” – will be assigned to the extraction part. As indicated in the installation section, starting Fast2 will launch an embedded worker, assigned by default to all tasks composing the migration workflow. This worker here will be our worker-D (for “Destination”, or “Default”).
Plug the worker-S onto the Fast2 broker (yes, the workers – as illustrated here – manifest themselves to the broker, and not the other way around) : to do so, open the config/application.properties of the worker-S :
# Fast2 2.1.0 configuration

# Remote broker host to use by the worker
broker.host=localhost

# Remote broker port to use by the worker
# broker.port=1789

# Broker connection settings to its ElasticSearch instance
# If you still wish to use the embedded flavor of Elasticsearch,
# you will need to modify the elasticearch/config/elasticsearch.yml accordingly.
# elasticsearch.host=localhost
# elasticsearch.port=9200

# Set to false to disable start of broker's embedded Elasticsearch
# broker.elasticsearch.embedded.enabled=true

# Set to false to disable start of broker's embedded Kibana
# broker.kibana.embedded.enabled=true
# broker.kibana.embedded.port=5601
# broker.kibana.embedded.maxRetries=200

# Broker embedded worker max memory
broker.embeddedworker.max.memory=1G

# Worker files creation prefix
worker.files.dir=files/

# Worker files creation pattern, the '@' character will be replaced by '$'
worker.files.pattern=@{campaign?:'shared'}/@{step?:'shared'}/@{documentId?:punnetId}

# Worker queue regex filter
# worker.queue.regex=.*

# Worker packages to scan for classes to configure as Tasks and Sources
# worker.scan.packages=com.fast2.,com.arondor.
# Fast2 2.8.0 configuration

# Remote broker url to use by the worker
broker.url=http://localhost:1789/broker

# Port exposed by Broker
server.port=1789
# Context path used by Broker
server.servlet.context-path=/

# Default upload size restrictions (for content)
spring.servlet.multipart.max-file-size=4GB
spring.servlet.multipart.max-request-size=4GB

# Broker connection settings to its OpenSearch instance
# If you still wish to use the embedded flavor of OpenSearch,
# you will need to modify the opensearch/config/opensearch.yml accordingly.
# opensearch.host=localhost
# opensearch.port=1790

# Set to false to disable start of broker's embedded OpenSearch
# broker.opensearch.embedded.enabled=true

# Set to false to disable start of broker's embedded Opensearch Dashboards
# broker.dashboards.embedded.enabled=true
# broker.dashboards.embedded.port=1791
# broker.dashboards.embedded.maxRetries=200

# Broker embedded worker max memory
broker.embeddedworker.max.memory=1G

# Disable auto-launch of embedded worker
# broker.embedded.worker.autostart=true

# Use remote for broker-based PunnetContentFactory, or local for worker-local PunnetContentFactory
worker.content.factory=local

# Worker temp files prefix, used when fetching remote content
worker.temp.dir=tmp/

# Worker files creation prefix
worker.files.dir=files/

# Worker files creation pattern, the '@' character will be replaced by '$'
worker.files.pattern=@{campaign?:'shared'}/@{step?:'shared'}/@{documentId?:punnetId}

# Worker queue regex filter
# worker.queue.regex=.*

# Worker packages to scan for classes to configure as Tasks and Sources
# worker.scan.packages=com.fast2.,com.arondor.

# Java library path for the worker, relative path from Fast2 root directory
# worker.java.library.path=

# Logging levels
logging.level.com.fast2.esbroker=INFO
logging.level.com.fast2.worker=INFO
logging.level.root=WARN
Update the name (or IP address) of the machine where Fast2 is running (broker.host), and the name of the queue which the worker will be assigned to (ex/ “extraction”).
- Start now the Fast2 server (documentation here) to have it up and running alongside the worker-D. This latter will be assigned to both the mapping of the metadata and the injection of the documents in the destination environment.
- The start the worker-S (documentation here).
Open your browser to reach the Fast2 UI, and the build up your migration workflow. For the sake of this example, 3 tasks only will suit our needs of extraction, metadata transformation and load.
3 tasks, 3 queues, 2 workers: lock and load !!
The extraction task will be linked to the same queue we mentioned in the config/application.properties of the lone worker (ex/ source-queue).
No need to set a queue for the last task, as it will be handled by default by the last worker started with the Fast2 server.

For this worker, the config/application.properties will have the queue details set as follows:
...
# Worker queue regex filter
worker.queue.regex=source-queue
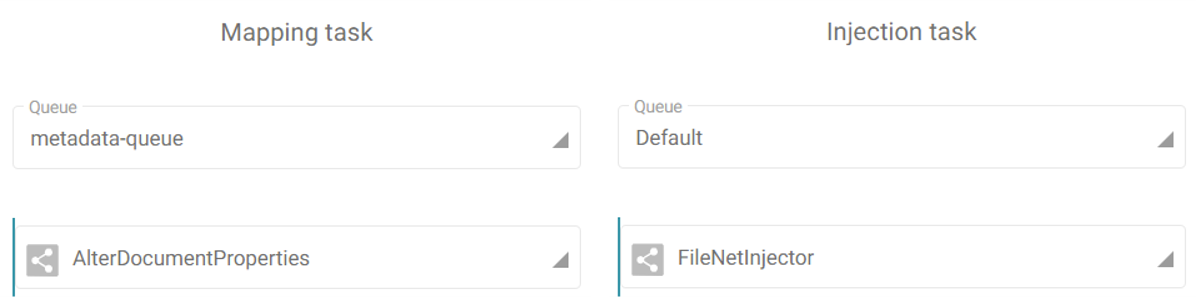
For this worker, the config/application.properties will have the queue details set as follows:
...
# Worker queue regex filter
worker.queue.regex=metadata-queue,default
Limits
Just like any architectural decisions, such model comes with is drawbacks and benefits. If the benefits can sound quite obvious given past explanations, the downsides are worth mentioning. We will shortly discuss here aout the two the most current:
- Resource sharing: the more workers you’ll start on the same machine, the less they’ll have individually available resources.
- Connections and sessions: duplication of workers induces duplications of server calls, therefore opened sessions.
Resource sharing
Let’s consider a migration server with 8GB of RAM (which is a pretty good start, don’t get me wrong): with a running database in the background — the embedded database instance which Fast2 relies on in terms of traceability — needing roughly 3GB, the operating system using 3GB as well, you’ll end up with only 2GB for your worker to open around 100 documents per second and performing content conversion, metadata transformation etc. Needless to say, adding a second worker won’t help you much here !
Increase the threads amount (which you can do in the server configuration, straight from the Fast2 UI) of the queues on which you worker will get the punnets to process will surely be the go-to way for increasing your current performances.
The most recommended scale-up here would be to start another worker on a different machine, using totally independent physical resources and combining them to the ones already solicited by the Fast2 server.
Connections and sessions maxout
A second non-negligible aspect is the number of connections and sessions opened by the workers to communicate with both the source and destination environments. Adding worker will consequently increase these numbers, especially if several threads have been allocated to their processing queues.
Common use-cases
Several workers on the same machine?
One easy application of multi-worker architecture could be the need of having several source system to extract documents from, via dedicated maps for each. Booting up several workers associated with the right task queues will provide sufficent segmentation to have your migration happen simultaneously.
Sessions conflicts can be prevented as well but such choices of architecture. At the end of the day, only one Fast2 server will have been managing all your different workflows, all you data will be stored in the same database, all with significantly better performance rates!
Several workers on the same queue?
In case of seeking for more physical resources for your Fast2 server which, let’s say, is not a scalable machine, you could envision to “plug” a second server to the first one: start another worker on the second machine, and have it aim to the initial Fast2 server where the broker is running. This separate worker will be able to process any task of your workflow, any queue as well, just like the embedded one.
However there would be absolutely no point in starting another worker assigned to the same queues as the embedded one on the Fast2 server. That won’t positively affect you performance rates. If that was you goal before scrolling this page, the secret relies in adding more threads to your queues (as mentioned earlier)!